Stay Up To Date With Us!
We will never spam you or share your email address.
Game Sound Design Strategies
GSD StrategiesCheck out the gamesounddesign.com strategies when you are feeling creatively uninspired. Each random strategy will present you with a new avenue to pursue. Give them a try!
Game Sound Design Glossary
GSD GlossaryOur game audio glossary has all the sound terms you have been wondering about. Game audio can be confusing enough without having to deal with a new technical language. We are constantly updating the database with new terms that relate to not only game audio but game developer terms as well.
Dynamic Music Creation Using Wwise
Article by Louis-Xavier Buffoni
Introduction
In the article "Making Music Interactive: Elaboration of the Feature Set in Wwise," an interactive music design was sporadically used to demonstrate a few of the interactive music features.
In this addendum, I will describe how I created this design as a way to help and inspire sound designers who want to transform a linear composition into music that adapts dynamically to gameplay.
Normally, the goal of adding a song to a game is to accompany an action sequence in a hypothetical game. In its interactive declination, the intensity of the song would adapt to the intensity of the action. For example, imagine a war game during a combat sequence. If a player is hiding far away from the combat, the intensity would be low. In the heat of battle, the intensity would gradually increase until something important happens, like victory or the death of the player.
To illustrate how to integrate interactive music into a game, I started out by composing a song that could support a combat action sequence in a traditional way. The song was not composed to be used in interactive music per se, except perhaps that its structure was kept relatively simple, composed of parts of 8 or 16 bars. The static arrangement of the song may be previewed here.
To follow along with this text, you can download the project here. It was created using Wwise 2010.1.3. If you don't currently have the latest Wwise 2014.1.4 authoring tool, download it here, and follow the installation instructions. Note that it will work with more recent versions; project migration will occur the first time you open it. Together, we will define how the game should affect the music, split the song into segments and gradually tweak the project so that they blend seamlessly into one another at run-time. The Interactive Music Hierarchy of the Wwise project has four separate music switch containers, corresponding to the 4 main sections of this article.
Basic Integration
Game Interface
Let's start by creating a switch group called "Intensity" with four arbitrary values: Idle, Mid, High and Climax. The game knows about this switch group, and pushes a new value when it is appropriate. In Wwise, switches and states are alike. From now on, switch group values will simply be referred to as States.
Each state and its lifetime are described below:
- The Climax state only occurs at the end of the game.
- The Idle state occurs when there is no or little action in the game. This state may last forever.
- The Mid state occurs when the action becomes more intense, moving into the High state as required. Mid may be sustained for some time, typically longer than High, which generally resolves quite quickly to Climax, or back to Mid if the player retreats from combat.
Assigning Content to Game States
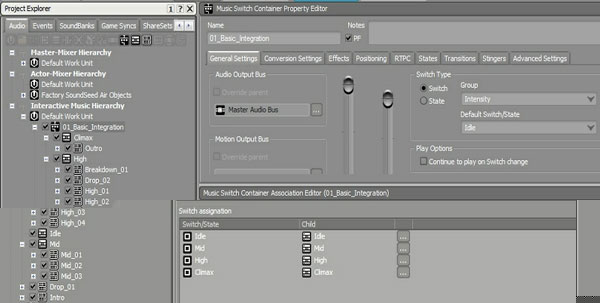
A good starting point is to split our song into segments of 8 or 16 bars, corresponding to the parts I mentioned earlier, next we will group them in sequential playlists, and then assign them to appropriate states. Since the second half of the song is generally more intense than the first half, let's group segments of the first part inside a playlist container called "Mid", and segments of the second part into another playlist called "High". "Climax" has the song's outro only, and "Idle" has no material yet. Now, create a switch container ("01_Basic_Integration" in the project), load the Interactive Music layout (F10), and associate all playlists with their corresponding state value: "Idle" with Idle, "Mid" with Mid, and so on (see image below). From now on, these names will be used loosely to refer either to switch values, playlists, or game states in general.
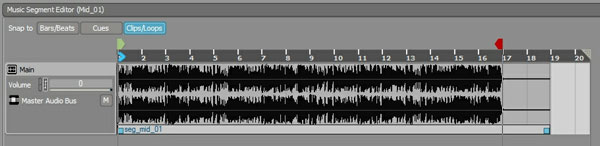
Before rendering each segment in my DAW, I generally insert a few bars of silence between them to capture the reverb tails and other unfinished notes, avoiding any abrupt cuts. These extra bars are used as "post-exit regions"; a segment's post-exit is played back over the following segment, and this helps blend the segments nicely (see image below).
Transitions between Each State
We need to set up basic transition rules between each state. Generally, when a state change occurs, the segment that is currently playing will be allowed to play until its Exit Cue, before the engine schedules the first segment of the next state. Additionally, the drop between Mid and High sections in the original song constitutes a separate segment ("Drop_01"), placed directly under the switch container, and is used as a transition segment between the Mid and High states (see image below).
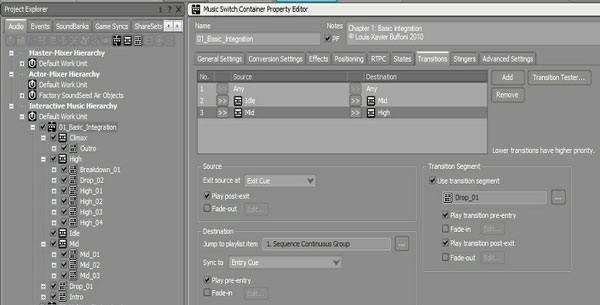
Likewise, the song's intro is used as a transition segment between Idle and Mid.
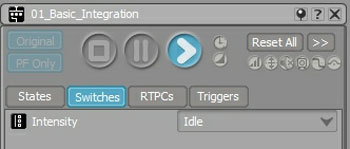
To hear how this works, in the Project Explorer, click on switch container "01_Basic_Integration" to load it in the Transport view (see image below), set the switch group to Idle, and press Play (nothing is heard), then change it to Mid (the intro plays back, followed by the segments of Mid), change it to High (Drop_01 plays back at the exit cue of the current segment, followed by the segments of High), and change it to Climax (the outro plays back at the end of the current segment).